
How to use the Rode Wireless Go II
When it comes to filming content, the Brisbane Camera Hire staff love to use the Rode Wireless Go II dual microphone system. It’s compact and easy to use with DSLR or mirrorless cameras or even with your iPhone.
Capturing good quality video hinges also on being able to capture good quality audio. Many videos have been let down by sub-par audio – think audio that is too loud, too quiet or has distracting background noise. You can alleviate these issues by using a lapel microphone – like the Rode Wireless Go II microphone system.
To watch a hands-on demonstration on how to use the Rode Wireless Go II, scroll down for the video below.
What is the Rode Wireless Go II?
The Rode Wireless Go II is a twin lapel kit. You will receive 2 x transmitters and 1 x receiver when you hire this from us.
This is the kit that we recommend you hire if you want to mic up 2 people for an interview type scenario, for example. If you only need to mic up one person, hire our Rode Wireless Go or Rode Filmmaker Lapels.
Connecting & pairing the Rode Wireless Go II
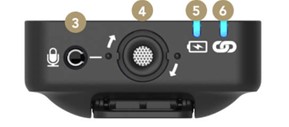
The transmitters come automatically paired to the receiver, so you can just power them up and go. If at any stage, the transmitter loses its connection with the receiver, the blue link symbol LED on the transmitter (6 on the image below) will flash.
The icons for that channel will go blank on the receiver also, making it easy to identify which transmitter you need to reconnect.
To re-pair the connection
- To reconnect them, press and hold the link button on the receiver (6 on the image below) for 3 seconds to enable pairing mode.
- Then single-click the power button on the transmitter and wait a few seconds for them to re-pair.
- That’s it!
Audio Output Modes – Merged or split?
The Wireless Go II gives you the option to record either in “merged” or “split” mode. Split mode allows you to record each transmitter onto separate channels (left and right) on the receivers output. This is handy and gives you more control in the editing suite – allowing you to adjust the levels of each channel (transmitter) separately. If one person was talking more loudly than the other, then you can either boost the volume of your 2nd speaker, or lower the volume of the loud speaker to compensate.
Please note – to adjust these channels separately, you will need to do this in your editing software by splitting the stereo track into two mono tracks.
If you are doing no, or minimal editing in post-production, or you want a simple process, just shoot in “merged” mode.
How to switch between merged and split audio
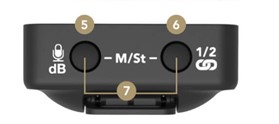
To switch between “merged” and “split”, press and hold both buttons on the receiver for 3 seconds (5 and 6 in the image below) while observing the output level meter on the LCD screen.
- When there are two output meters showing, you are in “split” mode.
- When there is just one output meter, you are in “merged” mode.
You can visit the RODE site to find out more about when to use merged or split audio channels.
Muting a transmitter
To cycle between your 2 transmitters, click the “pair” button (the link symbol on your receiver):
- 1 click will be transmitter 1
- 2 clicks will be transmitter 2
This will allow you to mute a transmitter, by selecting which one you want to mute and then pressing the mute button. Your talent can mute their own transmitter by a single, short press of the power button to mute and unmute.
How to get the cleanest signal for your audio recording?
- Set the gain in your camera’s audio menu as low as possible.
- Then, use the gain control on the Wireless Go II to adjust the signal, if required.
Gain control allows you to precisely tailor the output to avoid clipping or distortion. The gain control is found on the receiver and cuts your output level in 12 decibel increments. A single click of the gain button will allow you to adjust the gain. This only works if you are using the supplied 3.5mm output. If you are using the Wireless Go II on a smartphone or computer, you will need to adjust your gain in your recording software, or the Rode app.
You can read more about using the Rode Wireless Go with your mobile phone here.
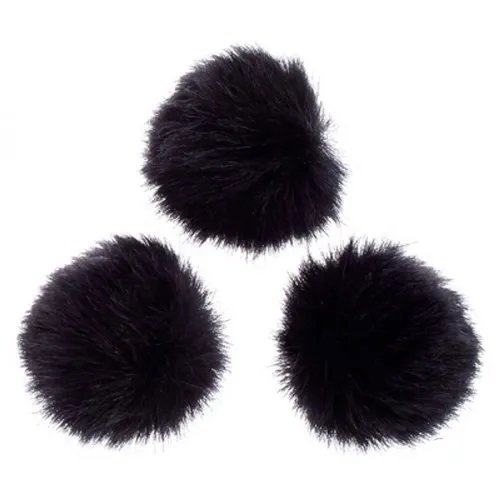
What else is in the kit?
In your Rode Wireless Go hire you will find some little furry puffs. These are windshields and are recommended to be attached to your transmitters to reduce any wind or background noise in your recordings. Basically, if you’re shooting outdoors, it’s never a bad thing just to use them.
Using the Rode Central App
Rode has a free app called Rode Central, available for Mac & Windows desktop, plus iOS and Android mobiles. You can download this and access many customizations to the Rode Wireless Go.
Visit the Rode website to download the Rode Central app.
Audio Storage – “Always Record” vs “Backup Mode”
Each of the transmitters has an on-board recording function and internal memory. They can store over 40 hours of compressed audio.
To activate this function, you must connect the transmitter to the Rode Central app and click the red “Always Record” button in the app. In “Always record” the transmitter will record from the moment it is switched on, regardless of whether it is connected to the receiver or not. This makes it a fantastic stand-alone field recorder.
In “Backup” recording mode, the transmitter will start recording when it connects to a receiver. This means that if the signal drops out, or you forget to record it on your device, you will have a backup recording for the duration the wireless connection was active.
Always test your audio!
For any important assignments, it is best practice to always record a sample of your audio, and then listen back to it, with good quality headphones to make sure you are happy with the quality before you begin.
Find out more about hiring Rode Wireless Go Lapels
If you have any questions, please contact us via the BrisbaneCameraHire website.
Or, if you’re ready to hire Rode Wireless Go Lapels, make a booking enquiry via these links and we’ll be in touch quickly.